DataMonsters: Power Apps, Blobs and Power BI Pt.2
Big Data Monsters
This is the sequel to Azure and the PowerApp, the key difference being the introduction of Power Automate into the process and we’ll be breaking down the Flow and the Power BI.
How we tie Power Apps, Azure Blob Storage and Power BI all together.
The general use case of this solution is this:
You are responsible for the collection of data from an unruly set of vendors. You want to make a vendor facing portal that allows vendors to upload files and automatically have them submitted to an approval process. Once approved they need to be added to the reporting dataset.
This DataMonster is broken into two parts, Azure and the PowerApp Pt. 1 and Power Automate and The Power BI Pt. 2
Here in Part 2, we will review the PowerAutomate, and the PowerBI set up to make this DataMonster work.
Overview:
The general overview is this.
PowerApps:
Data is uploaded to PowerApps
Data is then sent to an ‘unapproved’ blob storage location
Flow:
A flow is monitoring the ‘unapproved’ folder for new files
When a new file is found, an approvals process is started
If the the file is approved, it’s moved to the ‘approved’ folder
If the file is declined, the original uploaded is notified why their file was rejected
PowerBI
Flow sends a request to refresh the Power BI dataset
There are a lot of niggly bits in between, but I’ll do my best to cover them.
Something important to note is that the collection, storage and display can all be replaced with the following, un-comprehensive list of alternatives:
Collection:
E-Mail sinkhole
Proprietary software or front end
Microsoft Forms
Storage:
Sharepoint Lists
Sharepoint File Structures
Onedrive
Azure Table Storage
SQL server
Display:
Excel
Any custom front end
Tableau
The Flow:
The cool thing about using Flows and (Power Automate) to move the data around is we can leverage the approvals process. Either one person or a group of people will receive a direct download link to the file being reviewed. You can choose to have one person approve or require a group decision. This creates very fast approvals and minimum touch points. In theory you could also set reminders to bug people if a file doesn’t get approved in a certain amount of time.
Another advantage of Flows is you can provide direct user feedback. All the vendors in the scenario will know if their file was approved or rejected, and most importantly, why that was the case. There is potential for removing all human interaction by using more complex flows or leveraging Azure Functions, but we wanted to keep some humans involved in this process.
This is pretty simple but if you need to you can download the zip file Here>>.
Our Flow is like this:
Look for a new blob
Start an approval process
If approved, then copy the blob to the approved folder
Extract the contact address from the file name
Send a followup mail to the contact with the approval result
Refresh the Dataset
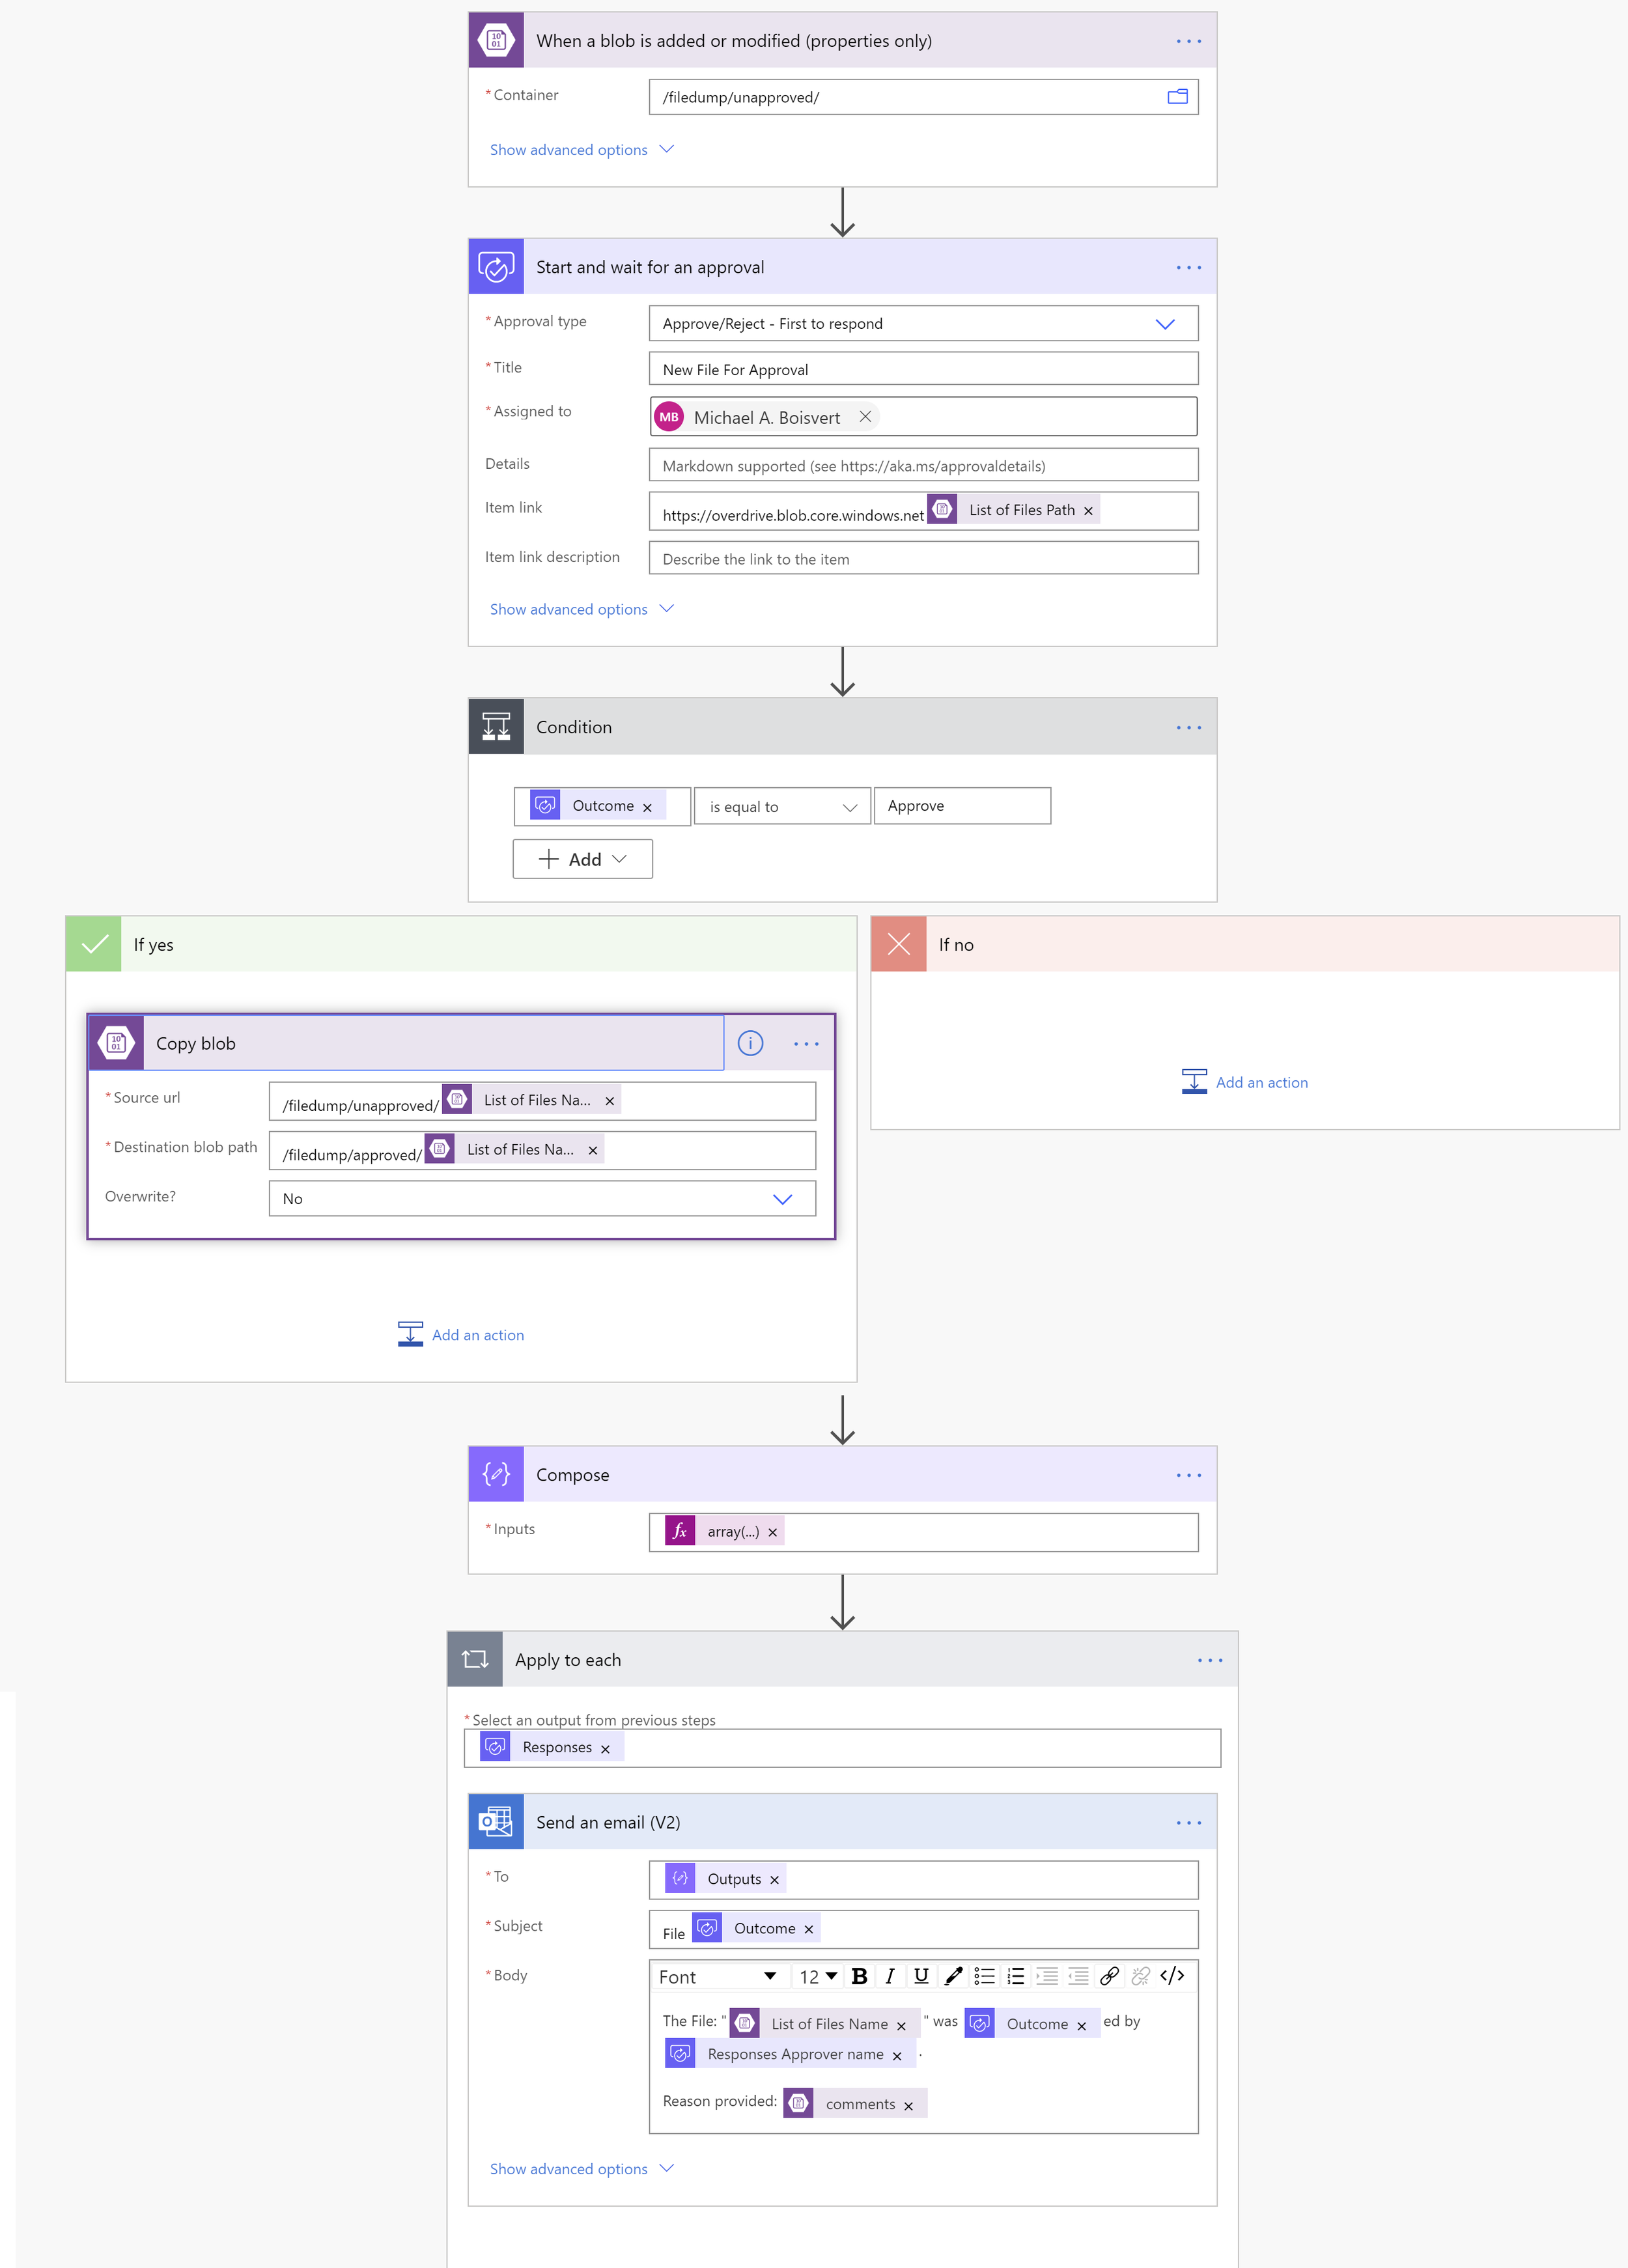
I’ll type out the steps, however, below is an image with all the settings we used for this flow.. I think that would be easier to emulate.
The first step is to create a connection to your BlobStorage account. In Flow.microsoft.com, expand Data -> Connections -> New Connection -> Azure Blob Storage and fill out the storage account name and key.
Create a new flow that starts with ‘When a blob is modified’. Set the container to ContainerName/Unapproved.
Create a new step ‘Start and wait for an approval’. Set it to approve/reject, give it a file and choose who you want to complete the approval process. Set the item link to https://StorageAccountName.blob.core.windows.net List of Files Path. LoFP comes from the dynamic content.
The next step should be a ‘Control’ -> ‘Condition’ where the dynamic Outcome is equal to ‘Approve’.
If Yes copy the unapproved blob to the approved folder
If No do nothing
After approvals use a custom ‘Compose’ to extract the return contact info from the file name using the following dynamic expression:
array(split(triggerBody()?['Name'], '-'))[0]
Setup an ‘apply to each’ step on Responses
‘Sent an Email’ to the Outputs from the custom 'Compose’ and setup your subject and body to however you like
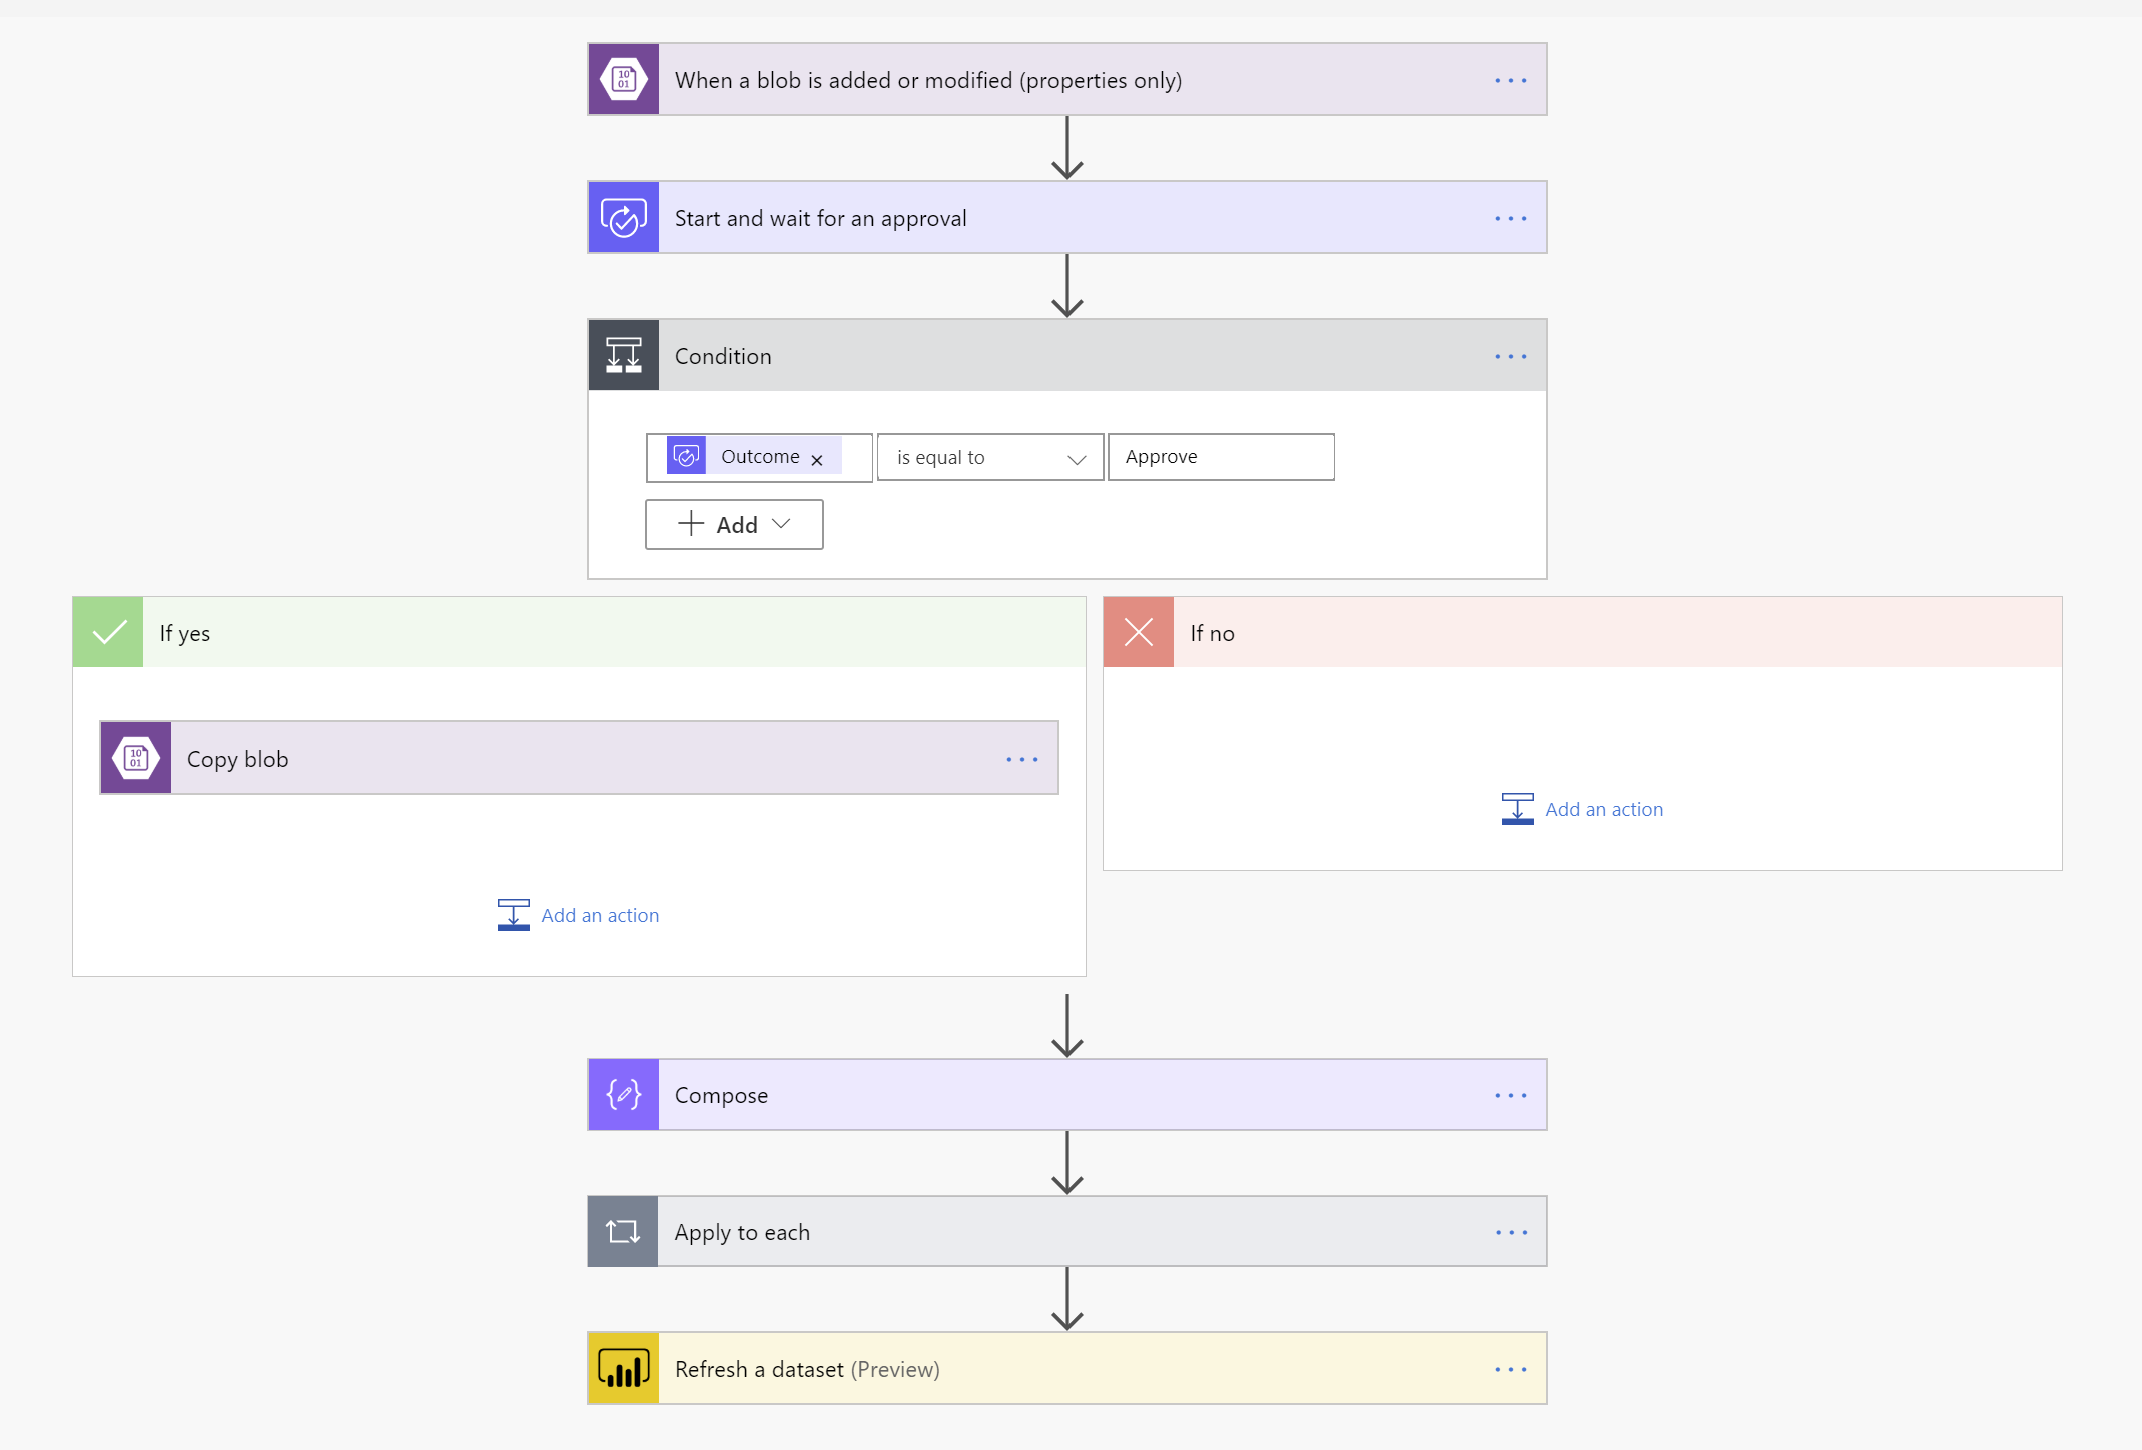
Theres one more step we need to add to the flow later on. We want our PowerBI file to autimagically refresh after this process. However, we do not have a dataset setup yet. We can add this in later on.
The Reporting:
PowerBI works like a champ on Azure Blob Storage! It absolutely demolishes the competition on web consumption in our opnion.
This is super simple stuff, but feel free to grab the PBIX Here>>.
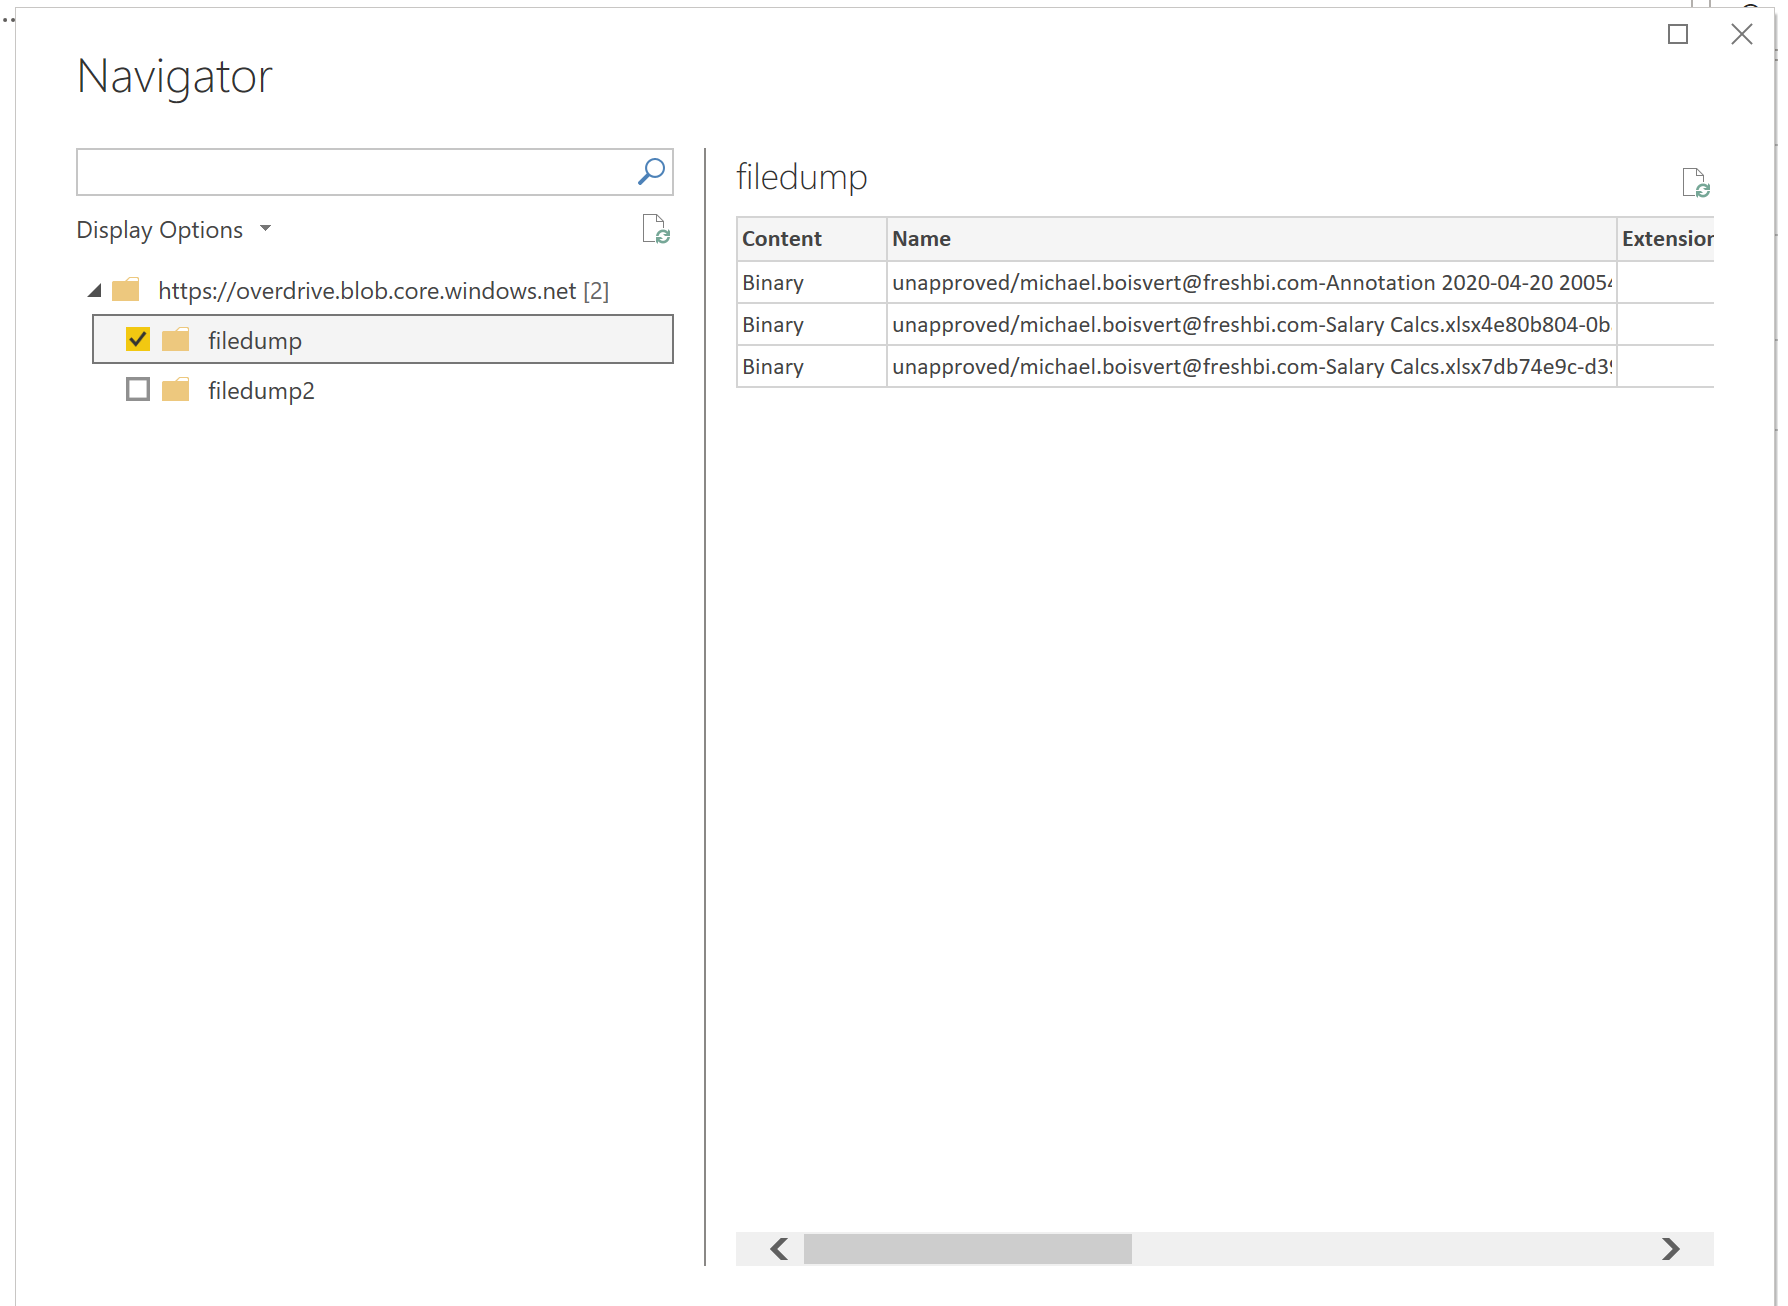
Step one, Get-Data -> Azure Blob Storage -> Account Name -> Storage Key
Very importantly, choose the container you want, in this case filedump, and click TRANSFORM DATA. Do not click load at this point.
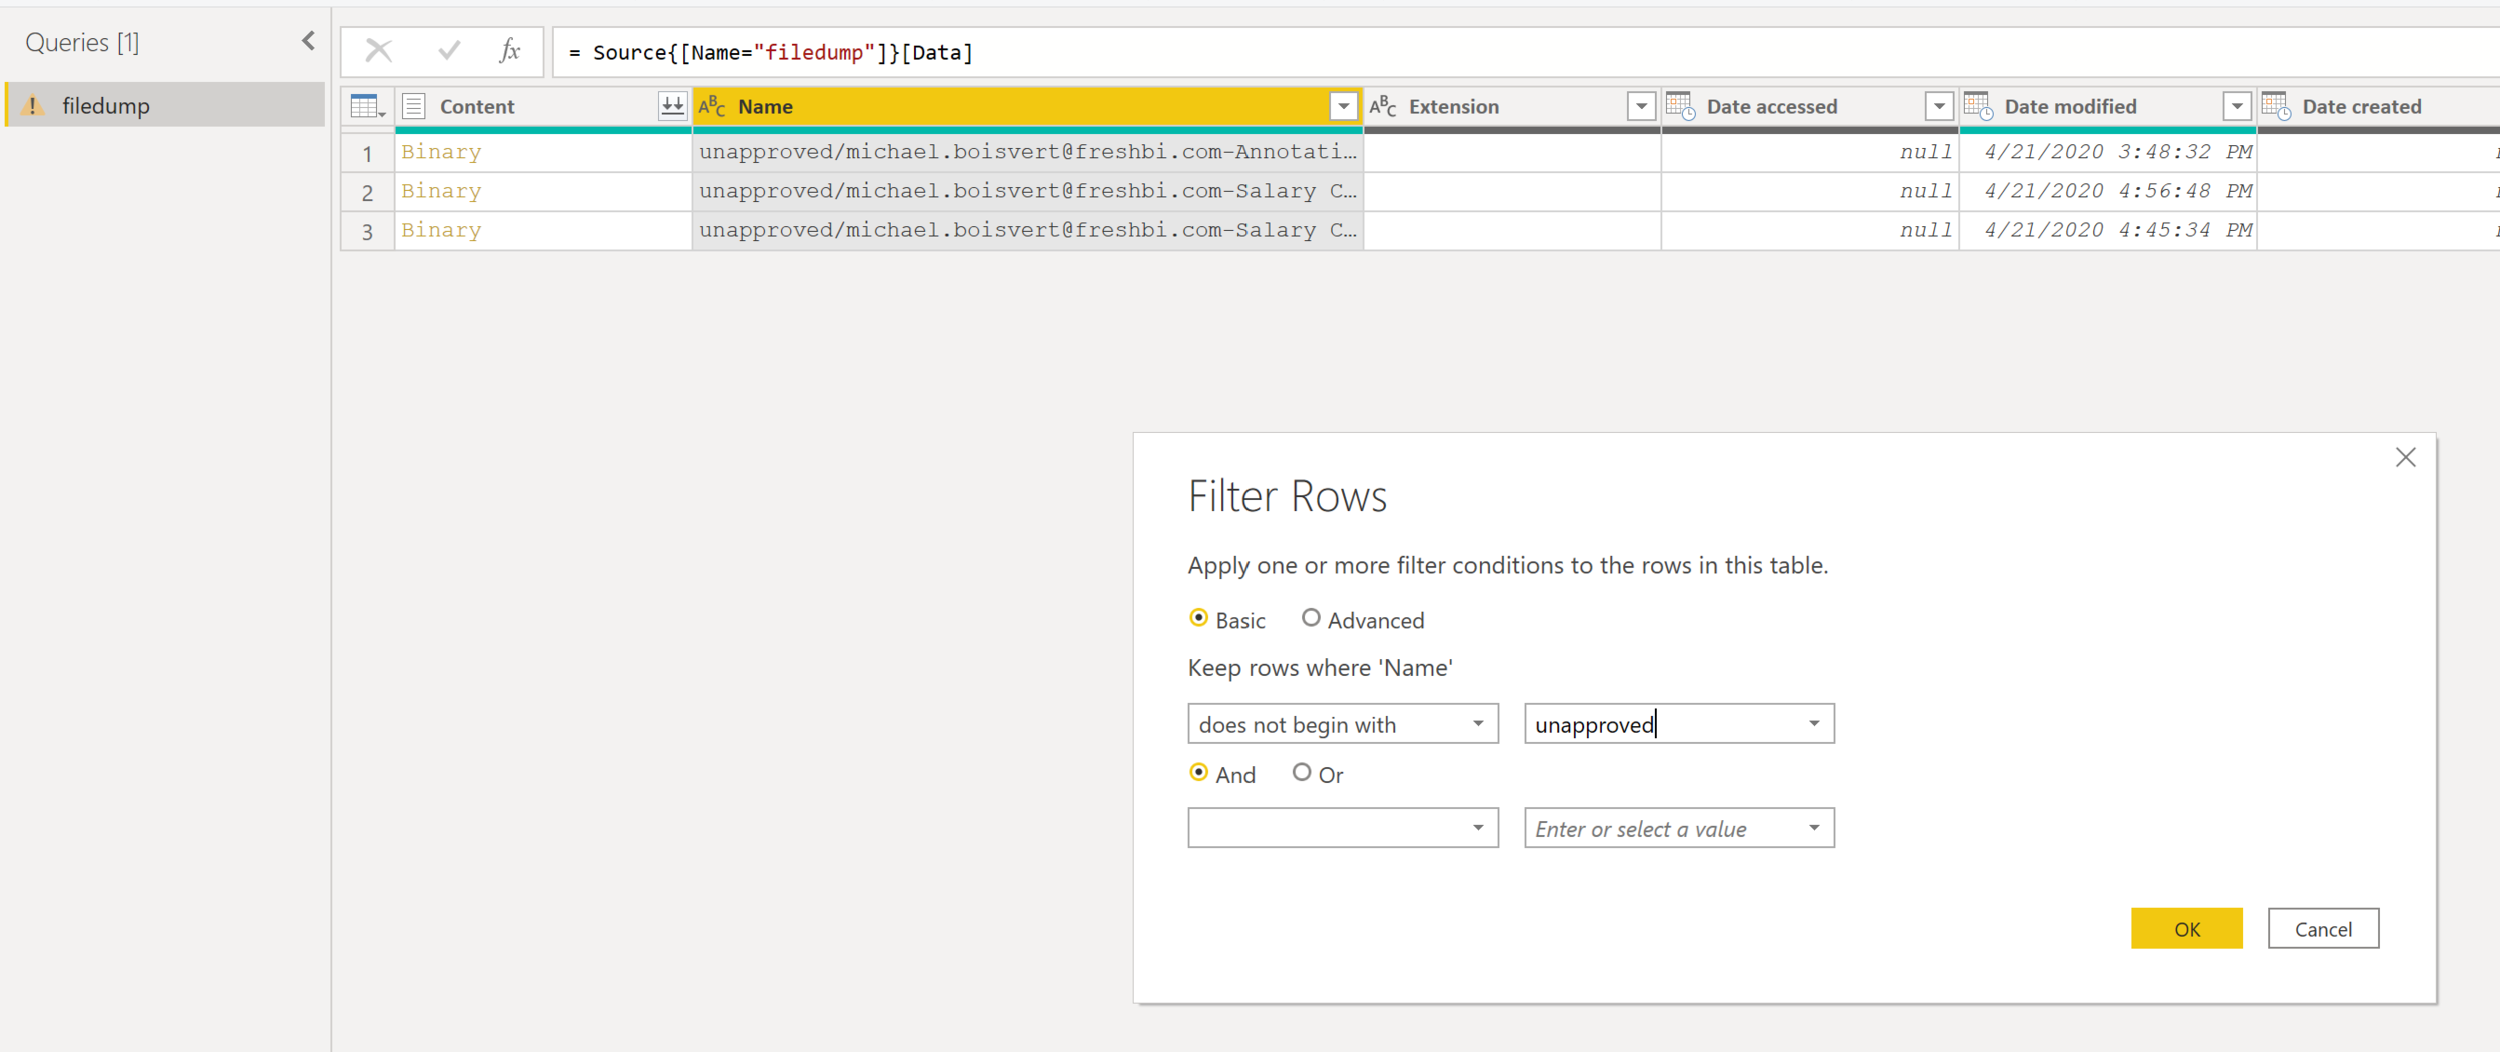
Also importantly, put a text filter on Name to say:
Table.SelectRows(filedump1, each not Text.StartsWith([Name], "unapproved"))
Basically just remove the files in the unapproved folder from the load.
At this point you can combine and load, but I’ll just load the data and put the name column in to a table.
Hit close and load and then publish!
That’s it!
Don’t forget to add the PowerBI refresh to the end of the data flow.

Closing Thoughts:
If we can make the Microsoft Stack work for us, we can save our analysts valuable time. When the reports create themselves and the data moves in a predictable manner we can allow our employees to maximize their time making human decisions. Let’s make the machines do the busy work, let the humans make complex decisions.
This example above is by no means comprehensive, but serves as the groundwork for a fully functional, cross stack, business logic application. Our intention is you can use this as a jumping off point to expand and customize for your business needs.
Our Latest Blogs
About FreshBI
Operating throughout USA and Canada, FreshBI is a boutique Microsoft Partner using Power BI to unlock the value trapped in your data so that your business can succeed.


